
Moving a WordPress site to a new server doesn't have to be a nightmare. Whether you're upgrading to a faster VPS, switching hosting providers, or setting up a completely new environment, migrations are a normal part of managing a website — and they don't have to cost you a full day of frustration.
But not all migrations are equal. A 500 MB blog behaves very differently from a 20 GB site with tens of thousands of images. A plugin that handles the small site flawlessly might choke and timeout on the large one.
This guide covers two proven approaches:
- Plugin-based migration — perfect for small to medium sites (under 2–3 GB). No command line needed.
- SSH + wget direct server migration — the professional method that works for any site, of any size. File transfers happen directly between servers — no downloading to your laptop, no re-uploading, no timeouts.
If your site is large, if you've hit plugin timeouts before, or if you simply want the most reliable and fastest method possible, the SSH method is what you're looking for. It's easier than it sounds, and every command is explained below.
Video Tutorial
Before reading on, here's a complete walkthrough video if you prefer to follow along visually:
Method 1: Plugin-Based Migration (Small to Medium Sites)
If your site is under 2–3 GB and you'd rather avoid the command line entirely, the Backup Migration plugin is an excellent choice. It handles everything through the WordPress dashboard and is especially beginner-friendly.
Step 1: Install and Run a Backup on Your Old Site
Install the Backup Migration plugin on your source (old) website directly from the WordPress Dashboard under Plugins → Add New, or download it from wordpress.org/plugins/backup-backup.
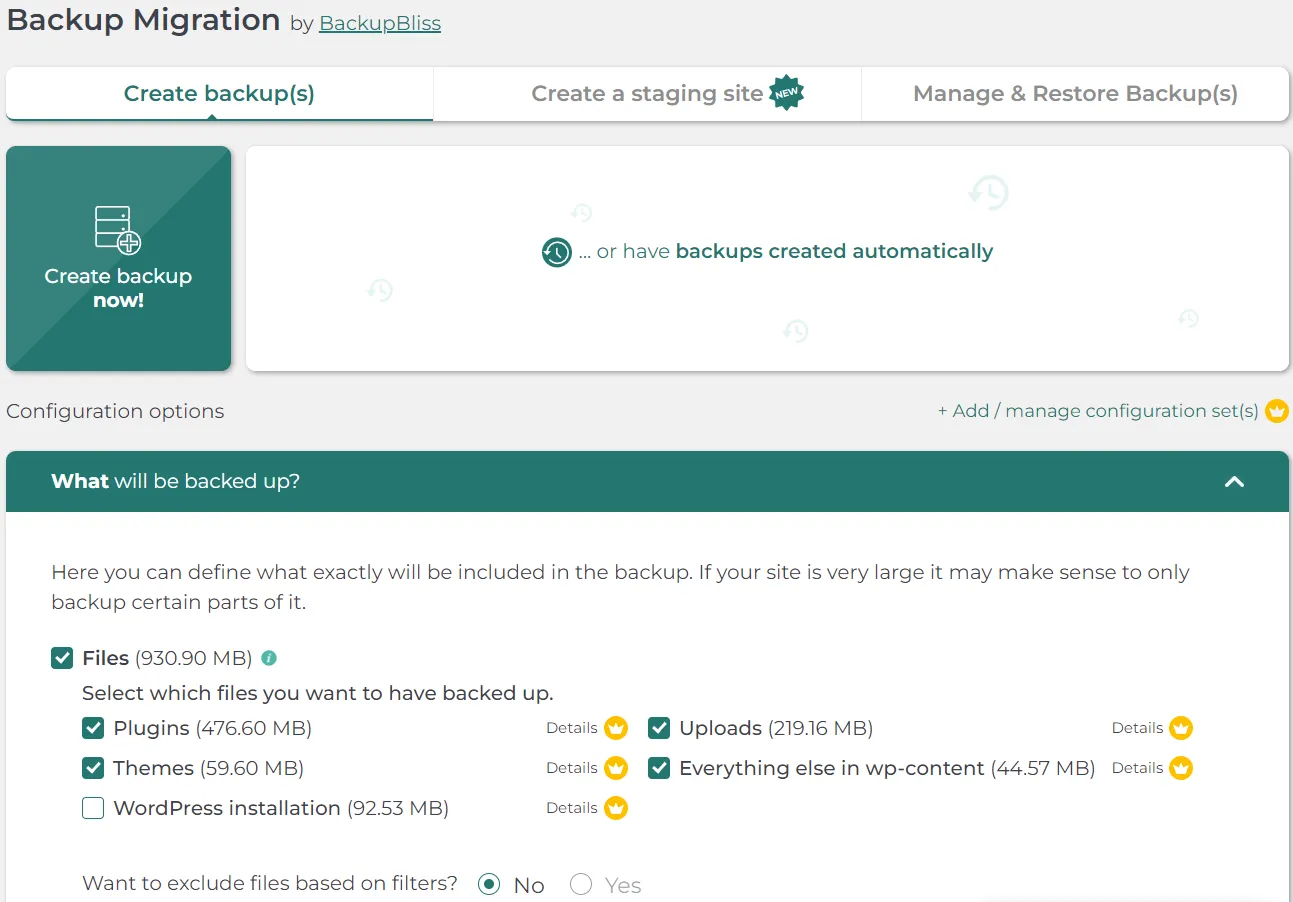
Once activated, the plugin adds its own menu item in your dashboard. Go to What will be backed up? and select all components — plugins, themes, files, folders, and databases. Save your selection.
Click Create backup now! to start. For smaller sites this typically completes in a couple of minutes. When done, download the backup zip file to your local storage as a safety copy.
For sites larger than 2 GB, consider the premium version of Backup Migration which handles larger archives without PHP timeout issues.
Step 2: Restore on the New Site
Set up WordPress on your destination server (most hosts offer one-click installs), then install the same Backup Migration plugin.
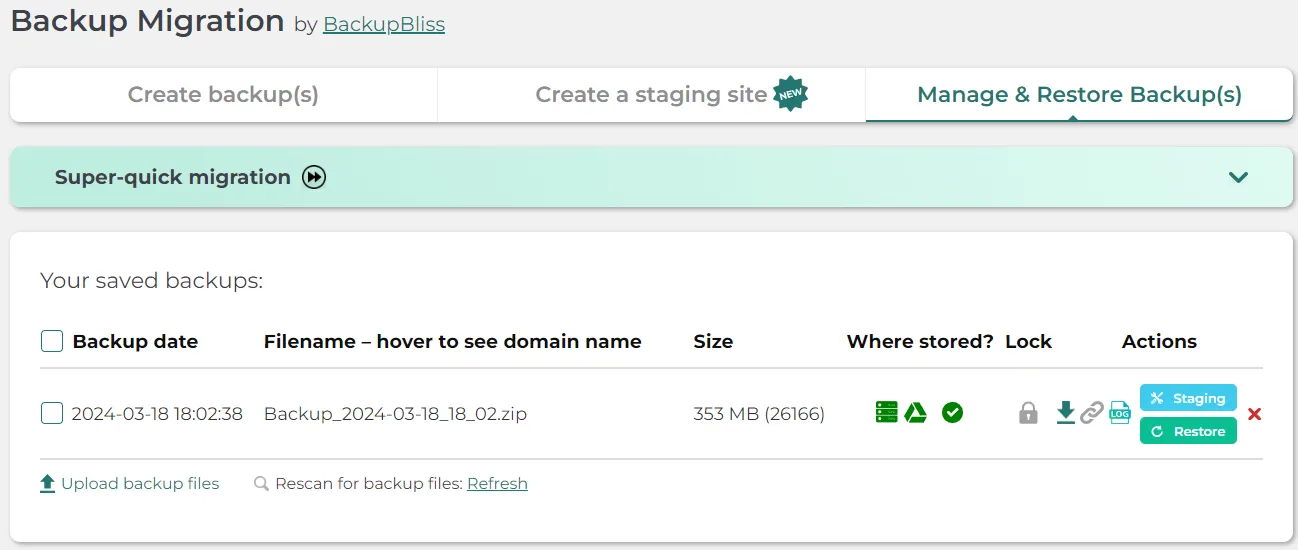
Go to Manage & Restore Backup(s). You have three options:
A) Super-quick migration — paste the backup file URL from the old site (found inside the plugin as a small link icon) and click Restore now! Best when both sites are online simultaneously.
B) Manual upload — upload the backup zip file you downloaded. Click Restore next to it. Use this when you have the file locally.
C) External storage (Google Drive) — link your Google account, sync your backup files, and restore from the cloud. Great if you store backups regularly.
Once restored, your site is live on its new host. Set up redirects from the old domain using the Redirection plugin if needed.
Method 2: SSH + wget Migration (Large Sites — Any Size)
This is the method to use when you have a big site, a VPS server, and want the fastest, most reliable migration possible. Instead of downloading a huge backup to your laptop and uploading it again, everything transfers directly between the two servers.
Why that matters:
- No dependency on your home or office internet connection
- Data center links run at 1 Gbps or faster — a 10 GB backup that would take hours locally might finish in minutes
- No browser timeouts, no incomplete file errors
- Works for sites of literally any size
What You Need Before Starting
- SSH access to your old server (the one you're migrating away from)
- A fresh new VPS (a clean install is recommended)
- Your domain name, and the ability to update its DNS when ready
- Basic comfort opening a terminal — every command below is explained in plain English
Recommended VPS providers for the new server:
- UpCloud VPS — consistently fast performance, excellent uptime SLAs, great for WordPress
- Contabo VPS — budget-friendly with generous specs, solid for general use
Phase 1: Prepare the Old Server
SSH into your old server first. All commands in this phase run on the old server — not the new one.
Step 1: Optional — Clean Up WordPress First
Before creating a backup, take a few minutes to remove unnecessary weight from your WordPress install. This directly reduces your backup size and speeds up every step that follows.
In your WordPress dashboard:
- Plugins → Installed Plugins — deactivate and delete anything you're not actively using
- Appearance → Themes — remove any themes that aren't your active theme
- Media Library — delete unused images and files if your hosting provider's interface makes it easy
Even removing a few large unused media files can shave hundreds of MB off your backup.
Step 2: Back Up Your Database
Your WordPress database contains everything that isn't a file — every post, page, comment, user account, plugin setting, WooCommerce order, and site configuration. We export it using mysqldump, a tool built into MySQL/MariaDB on virtually every server.
mysqldump -u DB_USER -p DB_NAME > sqldump_backup.sql
What each part means:
mysqldump— the database export tool that comes with MySQL/MariaDB-u DB_USER— replaceDB_USERwith your actual database username-p— tells it to prompt you for the password (more secure than typing it directly in the command)DB_NAME— replace with your actual database name> sqldump_backup.sql— the>redirects the output into a file namedsqldump_backup.sql
You'll be prompted to enter the database password. Type it and press Enter (you won't see characters — that's normal security behaviour).
The result is a plain-text .sql file containing every table and row from your database. For a typical blog this might be 10–50 MB. For a WooCommerce store with years of order history it could be several hundred MB.
Where to find your database credentials: Open the file
wp-config.phpin your site's root directory. Look for the lines definingDB_NAME,DB_USER, andDB_PASSWORD.
Step 3: Back Up Your wp-content Folder
The wp-content folder is the most important part of your WordPress files. It contains:
- uploads/ — every image, PDF, video, and media file your site has ever used
- plugins/ — all your installed plugins and their files
- themes/ — all your themes
We do not need to back up the WordPress core files (wp-admin/, wp-includes/, etc.) because we'll install a fresh copy on the new server. This actually works in your favour — you get a clean, up-to-date WordPress core without any cruft from the old install.
First, navigate to the root directory of your website:
cd /var/www/domain.com/htdocs/
Replace
domain.comwith your actual domain. The exact path varies by hosting setup — common alternatives include/var/www/html/,/home/username/public_html/, or/var/www/vhosts/domain.com/httpdocs/. If you're not sure, tryls /var/www/to see what directories exist.
Now create a compressed archive of just the wp-content folder:
tar -czvf wp_content_bck.tar.gz wp-content/
Breaking down this tar command:
tar— the archiving tool (think of it as a command-line zip utility, but more powerful)-c— create a new archive-z— compress using gzip (significantly reduces file size)-v— verbose output (shows you each file being added — useful to confirm it's working)-f wp_content_bck.tar.gz— the output file will be namedwp_content_bck.tar.gzwp-content/— the folder we're archiving
You'll see a stream of filenames in the terminal as files are added. For a large site with thousands of images, this can take a few minutes. When it finishes and returns you to the command prompt, the archive is complete.
Step 4: Move Backup Files to a Web-Accessible Directory
For the new server to download these files using wget, they need to be reachable via a plain HTTP URL. The simplest way is to move them to /var/www/html/, which is served by your web server.
mv wp_content_bck.tar.gz /var/www/html/
mv sqldump_backup.sql /var/www/html/
The mv command moves (not copies) files from one location to another. After running these, your backup files will be accessible at:
http://YOUR_OLD_SERVER_IP/wp_content_bck.tar.gzhttp://YOUR_OLD_SERVER_IP/sqldump_backup.sql
Security note: These files will be publicly downloadable from the internet for the duration of the migration. They contain your full site data, including user information. Keep the migration window as short as possible, and delete these files from
/var/www/html/immediately after the new server has downloaded them.
Phase 2: Set Up the New Server
Open a new terminal window and SSH into your new server. From here on, all commands run on the new server.
Step 5: Download the Backup Files from the Old Server
Start from the /root home directory:
pwd
pwd stands for Print Working Directory. It simply shows you your current location. You should see /root. If not, navigate there:
cd /root
Now download both backup files from your old server in a single command:
wget http://OLD_SERVER_IP/wp_content_bck.tar.gz && wget http://OLD_SERVER_IP/sqldump_backup.sql
Replace OLD_SERVER_IP with your old server's actual IP address (e.g., 198.51.100.42).
What's happening here:
wgetis a command-line download tool. Unlike a browser download, it runs entirely on the server, won't time out, and keeps running even if you disconnect from SSH- The
&&chains two commands together — the second only runs if the first succeeds - Since both servers are in data centers, they're connected via high-speed data center links. A 5 GB backup that would take 45 minutes over a home connection might only take 2–3 minutes server-to-server
Watch the progress bars as the files download. When both reach 100%, you're ready for the next step.
Step 6: Install a WordPress Server Stack on the New VPS
We'll use WordOps — an excellent open-source server manager that installs Nginx, PHP, MariaDB, Let's Encrypt SSL, and everything WordPress needs with just a few commands. It's the fastest and most reliable way to set up a production-ready WordPress environment on a fresh VPS.
Install WordOps:
wget -qO wo wops.cc && sudo bash wo
Breaking this down:
wget -qO wo wops.cc— quietly (without progress output) downloads the WordOps installer script and saves it as a local file namedwosudo bash wo— executes that installer script with elevated (root) privileges
The installer will set up the LEMP stack (Linux, Nginx, MariaDB, PHP) and takes a few minutes. You'll see installation progress in the terminal.
After it completes, reload your shell to activate tab-completion for wo commands:
bash -l
Now install the full WordPress server stack:
wo stack install
This installs the complete set of components: Nginx web server, PHP-FPM, MariaDB database, Redis (for object caching), and additional tools. You'll see each component being installed. Grab a coffee — this takes 3–5 minutes.
Step 7: Create a Fresh WordPress Site with SSL
With the stack ready, create a new WordPress installation for your domain:
wo site create domain.com --wp --php84 -le --force
What each flag does:
wo site create domain.com— tells WordOps to create a new site for your domain--wp— installs a fresh copy of WordPress--php84— uses PHP 8.4 (the current stable release — best for performance and security)-le— automatically obtains and configures a Let's Encrypt SSL certificate, enabling HTTPS for free--force— proceeds without stopping on non-critical warnings
Important: For Let's Encrypt to work, your domain's DNS A record must already point to this new server's IP address. If you haven't changed DNS yet, omit
-lefor now and runwo site update domain.com -lelater after DNS propagates.
After this command finishes, you have a fully functioning blank WordPress site. You can verify by opening http://domain.com in your browser — you should see a fresh WordPress install.
Step 8: Remove the Default wp-content Folder
The fresh WordPress install created its own default wp-content folder with placeholder themes and plugins. We need to completely remove it and replace it with your actual site's content from the backup.
Navigate to the site's files:
cd /var/www/domain.com/htdocs/
Remove the default wp-content:
rm -r wp-content/
rm -r removes a directory and everything inside it recursively. There's no undo for this command, so use it carefully. In this case it's completely intentional — we're making room for the real wp-content from your backup.
Step 9: Move the Backup Archive and Extract It
Go back to /root where you downloaded the backup files:
cd /root
Move the archive to the site directory:
mv wp_content_bck.tar.gz /var/www/domain.com/htdocs/
Navigate to the site directory:
cd /var/www/domain.com/htdocs/
Extract the archive:
tar -xzvf wp_content_bck.tar.gz
Extraction flags — the mirror image of when we created the archive:
-x— extract (the opposite of-cfor create)-z— decompress from gzip compression-v— verbose (shows filenames as they're extracted)-f wp_content_bck.tar.gz— the archive file to extract from
You'll see all the filenames scroll past as they're extracted. When the command finishes, you'll have a fully restored wp-content/ folder with all your uploads, plugins, and themes exactly as they were on the old server.
Step 10: Get the New Database Credentials
WordOps created a wp-config.php with freshly generated database credentials when it installed WordPress. We need to import our old database into this new database — which means we need to know those new credentials.
Open the wp-config.php file:
nano ../wp-config.php
..means "go one directory up" from where we are. Since we're inhtdocs/, this openswp-config.phpin the site root. Look for the three lines definingDB_NAME,DB_USER, andDB_PASSWORD.
Copy those three values. Then exit without saving: press Ctrl + X. Nano will ask if you want to save — press N.
Create a temporary scratch file so you have the credentials visible during the import step:
cd /root
nano temp
Paste the credentials you just copied, then save and exit: Ctrl + X → Y → Enter.
Confirm the file was saved correctly:
cat temp
cat displays a file's contents directly in the terminal — a quick sanity check before proceeding.
Step 11: Import the Database
With the credentials confirmed, import your old site's database into the new server's database:
mysql -u DB_USER -p DB_NAME < sqldump_backup.sql
Replace DB_USER and DB_NAME with the values from the temp file you just viewed.
mysql— the MySQL command-line client used to run queries and import data-u DB_USER— the database username from the new server's wp-config.php-p— prompts you to enter the database password (also from wp-config.php)DB_NAME— the new server's database name< sqldump_backup.sql— the<feeds your SQL backup file into MySQL as input
MySQL will process the file and rebuild every table, post, page, comment, plugin setting, order, and user from your old database into the new one. For large databases this can take a few minutes — be patient and let it finish.
Phase 3: Finalize and Verify
Step 12: Fix File Permissions
File permissions tell the operating system who can read, write, and execute each file and directory. After migration, permissions can sometimes be off — causing WordPress to show broken images, fail to upload files, or throw permission errors in the admin panel.
Set the correct ownership (so Nginx can read and write your files):
chown -R www-data:www-data /var/www/domain.com/
Set the correct permissions for directories (755 = owner can read/write/execute, others can read/execute):
find /var/www/domain.com/htdocs/ -type d -exec chmod 755 {} \;
Set the correct permissions for files (644 = owner can read/write, others can read only):
find /var/www/domain.com/htdocs/ -type f -exec chmod 644 {} \;
Why these specific values?
www-datais the system user that Nginx runs as. Setting ownership towww-data:www-dataensures the web server can access your files755on directories lets the web server navigate into them644on files lets the web server read them, but prevents execution (a security best practice for web-facing files)
Step 13: Clean Up the Temporary Credentials File
The temp file contains your database credentials in plain text. Delete it now that the import is done:
cd /root
rm -r temp
Step 14: Secure Your Backup Files for Future Reference
Keep your backups archived neatly in case you need to reference them:
cd /root
mkdir backupfiles
mv wp_content_bck.tar.gz backupfiles/
mv sqldump_backup.sql backupfiles/
mkdir creates the backupfiles directory, and mv moves both archive files into it. This keeps your /root directory clean while preserving the backups for a week or two — just in case an issue surfaces that requires re-checking something. Once you're fully confident the migration is solid, delete the entire backupfiles/ folder.
Also remember to delete the backup files from the old server's /var/www/html/ directory:
# Run this on the OLD server
rm /var/www/html/wp_content_bck.tar.gz
rm /var/www/html/sqldump_backup.sql
Step 15: Test Thoroughly Before Pointing DNS
Before announcing the new server to the world, test everything:
- Browse your site — check that your homepage, blog posts, and key pages load correctly
- Check all images — scroll through a few posts to confirm media files display properly
- Log in to wp-admin — verify all your settings, menus, and widgets are intact
- Test plugins — activate any plugins that need reactivating after migration
- Test forms — submit a test contact form if you have one
- Check SSL — confirm the padlock appears in the browser address bar
How to test before changing DNS: Add a temporary entry to your local machine's hosts file. On macOS/Linux, open /etc/hosts in a text editor with sudo:
NEW_SERVER_IP domain.com
This makes your browser route domain.com to the new server's IP — but only on your machine. No one else is affected. Remove this line after you've confirmed everything works and changed DNS officially.
Full Command Reference (Quick Copy-Paste)
Here's everything condensed for quick reference:
On the old server:
# Export the database
mysqldump -u DB_USER -p DB_NAME > sqldump_backup.sql

# Archive wp-content (from your site root)
cd /var/www/domain.com/htdocs/
tar -czvf wp_content_bck.tar.gz wp-content/

# Move both files to the public web directory
mv wp_content_bck.tar.gz /var/www/html/
mv sqldump_backup.sql /var/www/html/
On the new server:
# Download backups directly from the old server (replace OLD_SERVER_IP)
cd /root
wget http://OLD_SERVER_IP/wp_content_bck.tar.gz && wget http://OLD_SERVER_IP/sqldump_backup.sql

# Install WordOps and the WordPress stack
wget -qO wo wops.cc && sudo bash wo
bash -l
wo stack install

# Create WordPress site with PHP 8.4 and SSL
wo site create domain.com --wp --php84 -le --force

# Replace the default wp-content with your backup
cd /var/www/domain.com/htdocs/
rm -r wp-content/
cd /root
mv wp_content_bck.tar.gz /var/www/domain.com/htdocs/
cd /var/www/domain.com/htdocs/
tar -xzvf wp_content_bck.tar.gz

# Get DB credentials from the new wp-config.php
nano ../wp-config.php

# Import the database (use the credentials from wp-config.php)
mysql -u DB_USER -p DB_NAME < /root/sqldump_backup.sql

# Fix file permissions
chown -R www-data:www-data /var/www/domain.com/
find /var/www/domain.com/htdocs/ -type d -exec chmod 755 {} \;
find /var/www/domain.com/htdocs/ -type f -exec chmod 644 {} \;

# Clean up
cd /root
rm -r temp
mkdir backupfiles
mv wp_content_bck.tar.gz backupfiles/
mv sqldump_backup.sql backupfiles/
Common Issues and Fixes
Images not showing after migration: This is almost always a file permissions issue. Re-run the chown and chmod commands from Step 12.
wp-admin login not working: The database import may have brought over the old site URL. Run this in MySQL or phpMyAdmin: UPDATE wp_options SET option_value='https://domain.com' WHERE option_name='siteurl' OR option_name='home';
404 errors on posts and pages: Go to Settings → Permalinks in the WordPress dashboard and click Save Changes — this regenerates the Nginx rewrite rules without changing anything.
SSL certificate failed: Check that your domain's DNS A record is pointing to the new server's IP and that DNS has fully propagated (can take up to 48 hours, usually much less). Then run wo site update domain.com -le.
Database import failed with "Access denied": Double-check that you're using the credentials from the new server's wp-config.php, not the old one. The new server created a different database with different credentials.
Conclusion
Migrating a WordPress site is one of those tasks that sounds intimidating until you've done it once. After that, it becomes routine.
For small sites, the Backup Migration plugin handles everything through a friendly dashboard — no terminal needed. For larger sites, the SSH + wget method is the professional choice: it's faster, more reliable, and scales to any site size because the heavy lifting happens entirely within high-speed data center networks.
The key principle to remember: keep transfers on the server network. By pulling your backup from the old server directly to the new one with wget, you completely bypass your home internet connection as a bottleneck. You get data center speeds, no timeouts, and a clean migration every time.
If you're choosing a new VPS to migrate to, I recommend UpCloud for high-performance workloads, or Contabo if you need great specs at a more affordable price point.
Happy migrating!